1. 目录结构
1
2
3
4
5
6
├─.gradle
├─gradle
├─out
└─src
    ├─main
    └─test
一般情况,test 目录和main放在同一级目录。不存在的话,新建一个目录。
2. 新建测试类
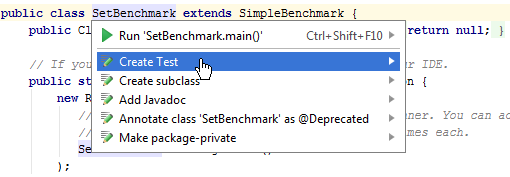
2.1. 在需要创建单元测试的类上,按“Alt + Enter”键

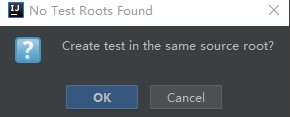
2.2 解决“No test Roots Found”问题

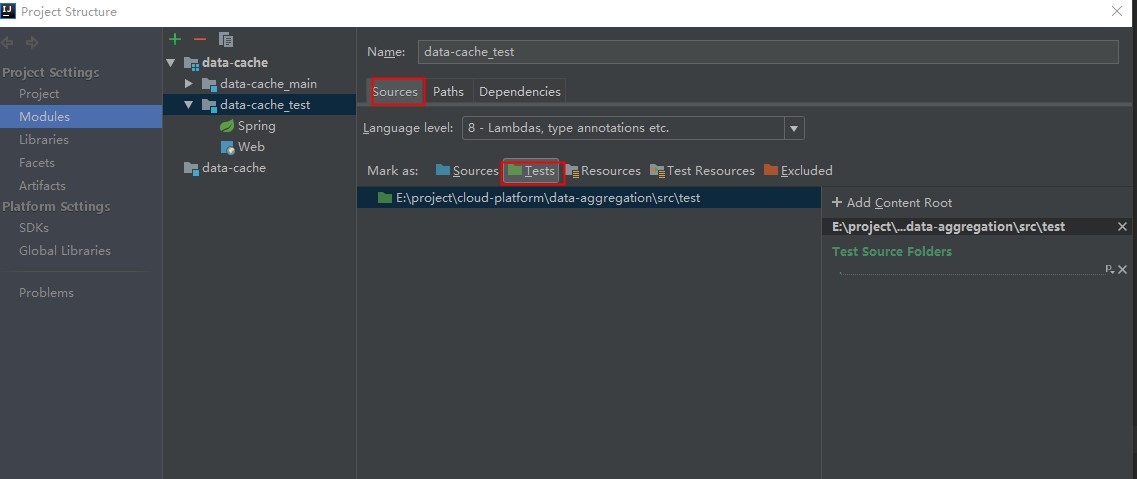
方法一: 通过 “Mark directory as” 应该也可以。
方法二: File->Project Structure->Modules and in “Sources” 选择 “test folder”

3. 添加依赖
1
2
    testCompile "org.springframework.boot:spring-boot-starter-test"
    testCompile "org.springframework.boot:spring-boot-test-autoconfigure"
4. 测试代码编写
运行有rest接口的程序
1
2
3
4
5
6
7
8
9
10
11
12
13
14
15
16
17
18
19
20
21
22
23
24
import org.junit.After;
import org.junit.Before;
import org.junit.Test;
import org.junit.runner.RunWith;
import org.springframework.boot.test.context.SpringBootTest;
import org.springframework.test.context.junit4.SpringJUnit4ClassRunner;
import org.springframework.test.context.web.WebAppConfiguration;

@RunWith(SpringRunner.class)                       // SpringJUnit支持,由此引入Spring-Test框架支持!
@SpringBootTest(classes = Application.class, webEnvironment=WebEnvironment.RANDOM_PORT) // 指定我们SpringBoot工程的Application启动类
public class MsgServiceTest {

    @Before
    public void setUp() throws Exception {
    }

    @After
    public void tearDown() throws Exception {
    }

    @Test
    public void add2Queue() {
        System.out.println("hello");
    }
- @RunWith(SpringRunner.class) 通知JUnit使用Spring testing支持. spring boot1.4版本后,SpringRunner 是SpringJUnit4ClassRunner的新名字
- @SpringBootTest 开启Spring Boot支持,例如加载application.yml, 同时给我们所有Spring Boot的好处。有了SpringBootTest后,SpringApplicationConfiguration被标记成Deprecated。
- webEnvironment 允许特定的web环境,可以选择MOCK servlet,或者运行实际的HTTP服务运行在RANDOM_PORT或者DEFINED_PORT.
- 我们可以通过@SpringBootTest的classes属性加载执行的配置。不指定classes, 测试会首先加载内部类的@Configuration, 如果失败, 它会查找首选的@SpringBootApplication类。
5. 运行单元测试
5.1 Idea运行单元测试
idea只需要在测试类上运行就可以了。
5.2 gradle运行单元测试
命令:
1
./gradlew test
不运行单元测试时,通过-i参数查看具体原因
1
./gradlew test -i
如果提示 No Test Source, 在build.gradle中增加sourceSet:
1
2
3
4
5
6
7
sourceSets {
    test {
        java {
            srcDir 'src/test'
        }
    }
}
只有”srcDir”指定目录,如果设置srcDir=”src/test”, 那么gradle会从 “$projectdir/src/test/com/…”寻找测试代码。